Addressing the issue of a noisy refrigerator can be a significant step towards a quieter, more serene home environment.
More often than not, an unusually loud fridge indicates potential malfunctioning of some sort.
It could be a minor issue, such as loose parts, or a serious one like a failing compressor.
Curbing this problem not only provides you with some much-needed peace but also prolongs your appliance’s lifespan and enhances efficiency.
However, diagnosing and silencing a noisy refrigerator requires knowledge and understanding of the inner workings of this often overlooked, yet vital, household appliance.
This article aims to effectively guide you through various proven methods to tackle and eliminate refrigerator noise.
Proven Methods To Silence A Noisy Refrigerator
1. Level the Refrigerator Properly
Before you can silence your noisy refrigerator, you must first create a stable, level environment for it to operate in.
Leveling a refrigerator is not merely an aesthetic consideration; it’s a practical one that can prevent unnecessary sounds and boost the appliance’s efficiency significantly.
Unleveled refrigerators may cause internal components to strain and work harder than necessary, leading to an increase in noise output.
Also, improperly leveled refrigerators can be subject to vibration noises that are exacerbated by the repeated opening and closing of the door.
An essential step in leveling your refrigerator involves checking the tilt using a builder’s level or even a simple bubble level app on your phone.
By adjusting the front and back legs or wheels of your refrigerator, you can ensure that it sits flat and reduce the potential for noise.
Keep in mind that the refrigerator should not be perfectly flat, but slightly tilted back, allowing the doors to close gently and securely on their own; this avoids noise from slamming doors while also ensuring proper sealing for temperature regulation.
This secure sealing is crucial for maintaining optimal internal temperatures, reducing the frequency of the refrigerator or freezer cycle and thus lowering noise levels over time.
It ensures not only better efficiency but also contributes to the overall reduction of operational noise produced by your refrigerator.
Once you’ve balanced your refrigerator to your satisfaction, it’s recommended that you check it periodically to ensure it maintains its level.
A sudden increase in noise could be a sign that the fridge has shifted and needs to be readjusted.
Understanding the technicalities of leveling a refrigerator properly might seem daunting, but it is quite simple once you get the hang of it.
This not only cuts down the noise levels, but also makes it easier to open or close the fridge, maintain organized shelves, and keep your appliance in good working condition for years to come.
By the time you finish this video, you’ll have gained a thorough understanding of the mechanics involved in leveling a refrigerator.
It features a clear, step-by-step demonstration that can help you wrangle your noisy refrigerator into quiet submission.
Your refrigerator is one of the most crucial appliances in your kitchen, and having it make unnecessary noise can be a significant nuisance.
Knowing how to properly level your refrigerator is the first step towards a peaceful kitchen experience.
2. Repair or replace the evaporator fan motor
One major cause of noise emanating from a refrigerator is a malfunctioning evaporator fan motor.
This device is crucial in the proper functioning of a fridge as it circulates the cool air from the freezer section to the refrigerator section.
Should the evaporator fan motor begin to fail, it often generates excessive noise during operation.
These sounds can range from slight humming to distinctive rattling or grinding sounds, which can be quite disruptively noisy.
To resolve the issue, you must first locate the evaporator fan, which is typically situated behind the freezer compartment, and visibly inspect it for any failures or damages.
Regularly checking the evaporator fan motor for failure signs is the first step towards silencing a noisy refrigerator.
After the mention quote, it is important to understand that the refrigerator’s overall effectiveness and efficiency are dependent on the smooth operation of the fan motor.
An irregular check-up within a period of two months can lead to minor issues escalating to major ones that could cause the fan motor to produce unpleasant noises.
After visually inspecting the evaporator fan, the next step is to confirm if the noise problem originates from the fan motor.
You can achieve this by manually activating the door switch while the fridge is running to observe if the noise changes or ceases.
For fridges with a digital display screen, turning off the fridge and waiting for around two minutes before restarting it might be more effective.
If the sound stops when the fan stops running, it suggests that the evaporator fan motor is the culprit.
Should you identify the evaporator fan motor as defective, you can either opt for a repair or a total replacement depending on its condition.
In most cases, a replacement of the fan motor is advised since it’s a more reliable long-term solution because it reduces the chances of the problem reoccurring.
Fixing or replacing the evaporator fan motor rightly is a sure way to silence a noisy refrigerator.
Notably, though the evaporator fan can be manually replaced, it is recommended that this type of work be left to a professional appliance repair technician, it is not advisable to try to repair it yourself if you lack the necessary skills and tools.
By fulfilling a professional fan motor replacement, you increase the efficiency of your fridge and ultimately achieve a quieter operation.
Hence, repair or replacement of the evaporator fan motor is a proven method to silence a noisy refrigerator.
3. Replace worn-out compressor mounts
A noisy refrigerator can be a constant source of irritation in any household.
The humming and buzzing sound coming from your fridge can be caused by different factors, one of which includes worn-out compressor mounts.
Compressor mounts, which are responsible for holding the compressor in place, absorb the vibration produced by the compressor when the refrigerator is running.
Over time, these mounts can degrade or wear out, leading to an increase in the level of noise produced by the fridge.
Thus, it is necessary to inspect these mounts regularly to check for signs of wear and tear.
You may find that the mounts have become loose or damaged, which can lead to heightened noise levels.
If you find that your compressor mounts are indeed worn out, you should replace them promptly to restore the silence in your kitchen.
Replacing the compressor mounts is not a herculean task and can be safely carried out at home.
You can purchase replacement mounts from a home improvement store or order online.
The process of changing these mounts involves disconnecting the power, removing the rear panel of the refrigerator, unscrewing the old mounts, and then installing the new ones.
This is a delicate task and requires one to be careful not to damage the compressor or the surrounding wiring and pipes.
Once the new mounts are correctly installed, they should immediately dampen the noise produced by the compressor.
By watching the video shared above, you’ll get step-by-step visual guidance on how to replace the compressor mounts.
Carefully following these steps may provide a practical and cost-effective solution to the noisy nuisance your refrigerator has been causing.
If, however, you are not comfortable tackling this task yourself, you should enlist the help of a professional to ensure that the replacement of the compressor mounts is done correctly.
4. Clean and rearrange internal contents.
Removing unnecessary items from your fridge can result in noise reduction as it allows for an easier air flow.
The internal arrangement of your fridge contents might be a source of noise.
Overfilling or underfilling your fridge can make it work harder, thus generating noise.
Maintaining a balanced fridge load is essential for its proper functioning.
In a packed fridge, the air cannot circulate properly, causing the equipment to work excessively and produce noise.
An unorganized fridge can also lead to vibration noises which are due to loose products stored within.
This is why careful placement of groceries is important, ensuring that they do not touch the sides of the refrigerator walls or each other.
Such positioning prevents them from causing any vibration noise when the compressor turns on.
Regular cleaning of your refrigerator can prevent the buildup of frost which can lead to a noisy appliance.
Wiping down the shelves and drawers and vacuuming the coil at the back of your fridge can help maintain its performance while reducing noise.
Always clean spills and crumbs immediately to prevent them from turning into grime which is harder to remove and may cause the fridge to overwork and make noise.
Lastly, make sure that the items are evenly distributed in your fridge because an unbalanced load can cause the fridge to wobble when the compressor is running.
This wobble can in turn be one of the sources of unwanted noise.
Again, a clean and well-arranged refrigerator not only ensures better preservation of your food but also contributes to noise reduction.
Your refrigerator’s cleaning and organization should be considered critically as part of your strategy to reduce the noise emanating from your fridge.
Therefore, to successfully reduce fridge noise, always clean and arrange internal content as a preventive measure against noise and vibration.
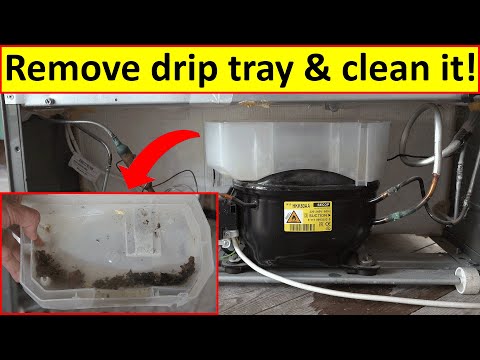
5. Check and tidy up the defrost tray.
Often, bustling noises from your refrigerator could be down to the neglected defrost tray.
Few are mindful of this hidden aspect of refrigerator functionality.
Yet, ensuring proper hygiene and regular supervision of the defrost tray plays a considerable role in assuring your fridge’s soundless operation.
A cluttered or messy defrost tray can invite unwanted resonance and lead to excessive noises.
It is good practice to timely clean and tidy up the defrost tray to reduce any unnecessary noise.
This practice not only eliminates unpleasant sounds but also impacts the overall performance and life span of the refrigerator.
Small particles or debris stuck can interfere with the fridge’s functioning, thus emitting unwanted sounds.
Observing this video, you will be guided through the detailed process of accessing, cleaning, and maintaining a fridge freezer’s drip tray.
This video serves as a handy resource to understand the intricate details.
Remember, integrated into our refrigerators’ system, the defrosts section works hard to maintain our coolers’ optimum temperature.
Therefore, regular cleaning and maintenance are critical.
How often should you check the tray, you might ask?
Well, it is recommended to clear the defrost tray every six months or immediately if you notice any irregular noises.
Reach the tray usually located towards the bottom end of the refrigerator.
Upon accessing it, use warm soapy water to clean the tray and remove any dust or debris.
Once finished, ensure the tray is dried completely before reinserting it back into the refrigerator.
Maintaining a clean defrost tray is not challenging but significantly affects the sound emanating from your refrigerator.
So, understanding and implementing the cleaning practices can help attenuate unwanted sounds, therefore contributing to our overall goal of silencing a noisy refrigerator.
6. Place padding under the fridge
One proven method to silence a noisy refrigerator is by placing padding under it. This is an inexpensive method and does not require any special technical skills to implement.
Soundproof mats or rubber pads are often used for this purpose.
These types of pads are specifically designed to absorb shock and reduce noise.
This is especially useful if the refrigerator is installed on a hard floor surface such as tile or hardwood.
These types of floor surfaces tend to amplify the vibrations, and subsequently, the noise produced by the refrigerator.
The padding should be substantial enough to cushion the appliance, but not so thick as to create instability.
In fact, the padding helps to protect the floor from any potential damage as well.
You will want to ensure that the padding is appropriately sized and cut to fit under the fridge.
This does not need to be a complicated process.
Basically, you want to make sure the entire bottom surface of the fridge is resting on the padding.
Many home improvement stores, as well as online retailers, offer a wide range of padding options.
It is best to choose one specifically designed for use with large appliances.
More importantly, premium quality pads also come with moisture-wicking properties which further extend the life of your refrigerator by preventing rust.
In addition to dampening the noise, these pads also perform a crucial function by reducing wear and tear on the refrigerator.
This is because the rubber pads can absorb and minimize the vibrations produced by the refrigerator.
The installation process is straightforward.
Simply select the correct size of the pads that fit under your fridge, lift the appliance slightly, place the pads under it and gently lower the fridge onto the pads.
Alternatively, some types of padding come in roll form.
For these types, all you need to do isroll out the required length, cut it, and then place it under the refrigerator.
This process not only reduces the operating noise but also improves the overall efficiency of the refrigerator.
The reason being, the padding helps to maintain the stability of the fridge, thus, fostering smoother operation.
Apart from reducing noise, this method also has the added advantage of preventing your refrigerator from moving.
This is particularly useful in spaces with uneven flooring or if the fridge is positioned near high-traffic areas where people often stumble upon it.
As a result, you achieve dual benefits – a quieter refrigerator and a more secure, stable appliance. This is why, placing padding under your fridge, is an affordable, yet highly effective way of dealing with a noisy refrigerator.
Although this method might seem relatively simple, it is surprisingly effective in reducing the noise levels of your refrigerator.
So, next time you find yourself dealing with an excessively noisy refrigerator, consider adding some form of padding under it.
Remember, proper installation of the padding is key to achieving the desired noise reduction. You will need to take care to position the padding correctly to ensure even weight distribution and absolute stability.
Lastly, always follow safety precautions while lifting and positioning the refrigerator on the padding.
In many cases, you might need assistance to lift the refrigerator safely.
When in doubt, it is always better to hire professional assistance.
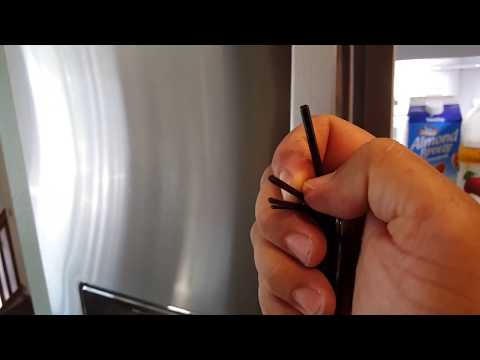
7. Tighten any loose screws.
One commonly overlooked cause of a noisy refrigerator can be loose screws.
These may be anywhere on the appliance, from the door handles to the internal components such as the fan and compressor.
This can result in an incessant rattling noise, turning your quiet kitchen into a noisy workplace.
While it may sound like a insignificant issue, it can become a bothersome problem if not duly addressed.
With the constant opening and closing of the refrigerator door, screws can easily become slack over time.
To silence your refrigerator, you will need to give it a thorough checkup and tighten any loose screws.
Having the right tools is crucial in ensuring you can properly tighten all the screws without causing any potential damage to the appliance.
This typically includes a Phillips head or a flathead screwdriver, depending on the type of screws your refrigerator utilizes.
Properly fastening these will not only eliminate the noise, but also ensure the longevity and optimal function of your fridge.
Speaking of tightening screws, you might just grab some insightful tips on how to tighten the fridge handle, among other appliance handles from the embedded video.
Using these tips, you might find that you’re able to tighten other areas of your refrigerator as well to prevent excessive vibrations and noise.
You’d be surprised how much the buzzing noise can be reduced by securing all loose components.
Every refrigerator model differs slightly, so always refer to your user manual for specific instructions.
Should you notice any worn out or damaged screws, it’s recommended to replace them to ensure your appliance can function without producing irritating noise.
Regularly performing such maintenance checks will keep your refrigerator in its top condition and noise-free.
So, next time you hear that mysterious clattering sound, don’t ignore it, and rush over with your screwdriver.
8. Adjust Temperature Settings
Among the many proven methods to silence a noisy refrigerator, adjusting its temperature settings can provide remarkably effective results.
A higher or lower than ideal temperature setting often puts excessive strain on your refrigerator, inducing unwanted noise.
It’s crucial to understand the standard settings for your specific brand and model of refrigerator before making any changes.
Typically, a moderate temperature setting is recommended for most household refrigerators.
By maintaining a moderate temperature, we can ensure that both your refrigerator’s compressor and the fan motor are not overtaxed.
Notably, the ideal temperature range for refrigerators should be between 37 to 40 degrees Fahrenheit (3-4 degrees Celsius) and the freezer section from 0 to 5 degrees Fahrenheit (-18 to -15 degrees Celsius).
This range keeps your food well preserved and also minimizes the load on the compressor and other components, which, in turn, reduces any potential noise.
Moreover, a refrigerator that is adjusted to excessively low temperature settings tends to work harder, which can result in additional noise.
To perfectly adjust the temperature, you should start by checking the current settings.
If the temperature of your refrigerator is set above or below the ideal range, slowly adjust the settings until you reach the optimal temperature levels.
Remember to be patient, as it might take a couple of hours for the temperature changes to take effect and the noise level to stabilize.
Moreover, overstuffing your refrigerator or placing hot items directly into it can also cause temperature fluctuations, which may result in additional noise.
It’s therefore crucial to avoid such practices to maintain the optimal temperature inside the refrigerator at all times.
Again, by simply learning to properly adjust the temperature settings of your refrigerator and adhering to standard practices, you can significantly reduce noise creation.
9. Insulate the fridge with acoustic foam.
While this may seem like an out-of-the-box solution, using acoustic foam to insulate your refrigerator could make a significant difference in reducing noise levels.
Acoustic foam is a special kind of soundproofing material that works by absorbing sound waves, thereby minimizing the amount of sound that can escape from the appliance.
Installing acoustic foam is a fairly straightforward task.
All you need to do is cut the foam to the appropriate size and attach it to the back and sides of your refrigerator.
The foam can be easily attached with adhesive or even heavy-duty tape.
But remember, you also need to consider ventilation.
While the foam should cover as much of the refrigerator as possible, it’s important to leave space for the fridge’s vents.
This will keep your appliance running efficiently without overheating.
Cutting the foam might seem a bit tricky, but with a bit of patience and precision, it can be accomplished with ease.
Take your time to measure and cut accurately because the better the fit, the better the sound absorption.
As with most soundproofing techniques, the density of the foam plays a significant role in its effectiveness.
This means that the denser the foam, the more sound waves it can absorb.
Therefore, investing in high-density foam should be considered for better results.
Also, do note that while acoustic foam can be extremely useful in eliminating the humming and whirring noises that refrigerators make, it will not be totally effective in reducing impact noise.
For that, you may require other strategies like proper leveling or tightening loose screws as stated earlier in this guide.
>https://www.youtube.com/watch?v=x08HlTmry_o
Whether you’re a novice or a pro at DIY tasks, the video linked above will provide hands-on guidance about fitting acoustic foam on your refrigerator.
You’ll get to see how the foam is measured, cut, and affixed in real time, offering great practical advice.
While it’s clear that applying acoustic foam can help reduce refrigerator noise to a great extent, remember that it’s just one of the many methods in your arsenal.
Consider all the options outlined in this article to give yourself the best chance to silence that pesky noisy refrigerator.
10. Replace Old, Worn-Out Gaskets
The function of gaskets on your refrigerator may seem insignificant, however, their role in maintaining temperature and noise reduction is substantial.
Gaskets are rubber seals that are crucial for tightly closing the refrigerator’s doors.
Over the years, consistent usage leads to the wearing out, hardening or even cracking of these gaskets.
Many people aren’t aware that when the gasket is worn-out, the refrigerator has to work harder to maintain the set temperature, making more noise in the process.
Thus, a faulty or old gasket can be a potential reason for the noise produced by a refrigerator.
Replacing them could prove a simple yet effective solution to reducing the noise of your refrigerator operations.
However, keep in mind that the process of replacing old gaskets isn’t a difficult one but it requires attention and precision.
The first step is to identify the correct gasket for your model of refrigerator.
You should be able to find this information in the note manual book.
Afterward, gently remove the old gasket from the refrigerator door.
It is held in place by several screws, so taking extra caution here is advisable.
Once fully remove, clean the area where the gasket was located to make sure there’s no residue remaining.
It is advisable to let this area dry before you install the new gasket to ensure the insulation is working at its best ability.
Now is the time to install the new gasket.
Make sure it is properly fitted and secured to the refrigerator door by testing the tightness of the seal.
If your refrigerator is still making noise after the gasket replacement, consider checking other parts like the fans or compressor for issues.
Without a doubt, the replacement of worn-out gaskets can be an efficient way to help silence your noisy refrigerator.
Remember, it is always recommended to consult with a professional if you’re experiencing difficulty with installing major parts like gaskets to ensure optimal refrigerator performance.
11. Move the Fridge Away from Walls
Many people have a tendency to push their fridge against the wall to fit it into a specific design or layout of their kitchen.
However, this can inadvertently cause more noise as the vibrations from the refrigerator are transferred directly into the wall, amplifying the sound.
Moreover, insufficient space between the fridge and the wall can hinder the appliance’s ability to dissipate heat, making it work harder and therefore produce more noise.
One of the simplest and most effective solutions to this problem is to move your fridge away from the walls.
By creating a gap, you minimize direct contact between the fridge and the wall, thereby reducing the transfer and amplification of vibrations.
This also improves air circulation around the fridge, helping it to run more efficiently and quietly.
A distance of around 2 inches should be sufficient for most models of refrigerators.
However, it is worth consulting your fridge’s manual for any specific recommendations by the manufacturer.
When relocating your fridge, it’s also important to ensure it remains level, as an uneven fridge can also be a source of noise.
Remember, moving a fridge can be a physically demanding task, especially if it’s a larger model or built-in unit.
To assist with this, we’ve included a very helpful video that provides valuable tips.
This video offers a practical demonstration on how to safely move your fridge, especially when it’s tightly wedged between the countertop and the wall.
Furthermore, it shows the correct way to readjust and level your fridge once you’ve moved it.
Again, by strategically moving your fridge away from the walls, you can effectively minimize the noise it produces, ensuring a more quiet and peaceful environment in your kitchen.
Whether you’re planning a full kitchen remodel or simply trying to address the loud humming of your fridge, remember that a small move can make a big difference in terms of noise reduction.
So, don’t hesitate to give it a try!
You might be pleasantly surprised by the improvement.
12. Regularly defrost to prevent ice buildup.
Preventing ice buildup in your refrigerator is critical to reduce noise and maintain optimal function.
When a refrigerator becomes excessively frosted, it can cause the evaporator fan to work overtime, creating unnecessary noises and energy usage.
Unattended frost can foster undue stress on the refrigerator components, thereby creating noise.
Furthermore, ice accumulation hinders the air circulation within the refrigerator, and this can severely affect its cooling capacity.
The refrigerator might start to run longer to maintain the set temperature, causing more noise due to prolonged compressor operation.
In some cases, an over-frosted refrigerator might begin dripping water once the ice starts to melt, and this water could potentially reach the motor or the compressor.
The noise that a refrigerator makes when this occurs is often quite noticeable and persistent.
It’s also worth noting that not all refrigerators are self-defrosting.
The frost-free units typically come with a heater fitted within their walls to prevent any frost from forming.
However, if you have a manual defrost fridge, then you might need to defrost it regularly.
To defrost your refrigerator, you need to turn it off, unplug it from the power source, and empty its contents.
Keeping the doors open will allow the ice to melt.
For quicker results, you can place a pan of hot water inside and close the doors.
It’s important to occasionally drain the water and replace it with fresh hot water until all the frost has melted.
Using plastic or wooden scrapers can also help speed up the defrosting process.
However, using metal or sharp objects is discouraged as they can puncture or damage the lining of the freezer.
It’s important to be patient and wait for the frost to soften before scraping it off.
Properly defrosting your refrigerator not only cuts down on noise but it also increases the appliance’s efficiency.
Defrosting optimizes the performance of your fridge, allowing it to cool more efficiently and thereby reducing the amount of time the compressor needs to operate.
Reduced compressor operation subsequently leads to lower noise levels.
Moreover, defrosting your refrigerator can significantly increase its lifespan.
Ice buildup can overwork your fridge, causing its components to wear out faster.
Thus, regular defrosting can prevent premature aging of your refrigerator and its parts.
Even so, the frequency of defrosting largely depends on the model of your refrigerator, your usage habits, and the humidity level in your area.
Some fridges might need a monthly defrost, while others might need defrosting only once or twice a year.
To heed an effective defrosting schedule, you should always refer to your refrigerator’s manual or consult a professional.
Resolving the issue of ice buildup can go a long way towards making your fridge run quietly.
It is a simple yet effective solution that requires minimal effort and cost.
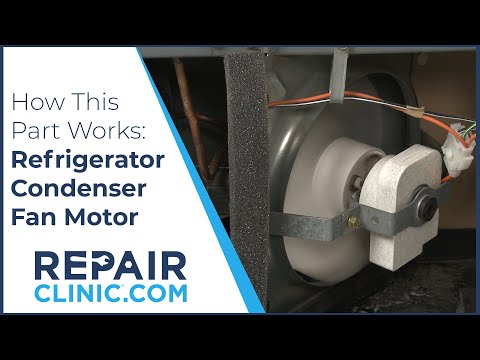
13. Repair or Replace the Condenser Fan
One of the prime reasons a refrigerator makes noise can be traced back to a malfunctioning or damaged condenser fan.
The role of this component is vital in a refrigerating system as it cools the refrigerant heated by the compressor.
Under normal circumstances, the condenser fan operates quietly and smoothly, circulating air over the condenser coils.
Problems start emanating when the fan either gets damaged or gathers too much dust.
Common symptoms of a faulty condenser fan include a loud noise, overheating of the refrigerator, or inadequate cooling.
If you are experiencing these issues, it could be possible that the condenser fan needs repair or replacement.
“When a refrigerator generates noise due to a faulty condenser fan, the only viable solution is to repair or replace the fan.”
This problem can be fixed by technicians who can inspect the fan for accumulation of dust, broken fan blades, issues with the motor, or faulty wiring.
Various replacement parts are available in the market today, which makes it easy for the technician to replace any faulty element, whether it is just the blades or the entire fan assembly.
However, ensure that the technician you enlist for this task is skilled and experienced.
If you’re handy and comfortable around appliances, you can attempt this repair yourself.
However, make sure you turn off your refrigerator and disconnect it from its power source before you do so.
Components of a refrigerator, especially parts like the condenser fan, can be electrically dangerous.
Also, correctly putting the fan back post-repair is crucial to its effective operation.
If you’re attempting a self-repair or replacement of a condenser fan, here’s a helpful resource.
Watching the above video, you can learn the workings of a refrigerator condenser fan motor and how to install it correctly.
Remember, a working condenser fan is vital.
So, be ready to call professionals if you’re unsure about the repair process.
Leave no room for error, especially when it comes to appliances that continuously operate day and night.
A misstep could lead to bigger problems down the line.
So, all our efforts go into diagnosing the cause of the refrigerator noise. In most cases, it has been found that addressing issues with the condenser fan has substantially reduced the noise level of the refrigerator.
Thus, attending to it in the first instance will save you a lot of bothered, unwanted and unwanted noise, thereby, extending the longevity of the refrigerator.
On the whole, a noisy refrigerator is primarily an indication of underlying issues that need immediate attention.
The condenser fan plays a key role in this context. Remember to keep it clean, keep it in good running condition, repair it when needed, or replace it entirely if necessary – all in a bid to silence your noisy refrigerator.
14. Lubricate the Fan of the Refrigerator
When considering the overall functioning of a refrigerator, the fan is a component that cannot be overlooked.
It plays a part in circulating cold air throughout the entire unit.
Over time, as with any other mechanical device, the fan experiences wear and tear.
Unusual fan noises can significantly contribute to refrigerator noise.
These noises are not only irritating but could also indicate that your fridge may not be operating at its peak efficiency.
This could lead to higher energy consumption and compromises the freshness of your groceries.
One of the most effective ways to quiet a noisy refrigerator and ensure its seamless operation is to properly lubricate the fan.
The process of lubricating the fan should start with identifying its location.
In most refrigerator models, the fan is located at the back, quite close to the coil.
Turn off and unplug the refrigerator before you start lubricating the fan.
Safety should always be your top priority.
This step is crucial because it prevents electric shock and other possible dangers while carrying out the lubrication process.
Necessary tools for this task generally include a socket or ratchet set and lubricant such as high-quality mechanical grease or white lithium grease.
It’s important to note that lubricating the fan alone isn’t sufficient to silence a noisy refrigerator.
Prior to lubrication, it is strongly recommended to clean the fan.
This can involve using a damp cloth, a mild detergent, and warm water to wipe away any dust or debris accumulation.
The next step is locating the lubrication ports on the fan motor.
These are tiny holes or gaps where the lubricant is added.
The correct amount of lubricant should be added into these ports.
The right lubrication will not only reduce noise but will also add to the life expectancy of the fan.
After lubrication, It’s crucial to check the operation of the fan.
Plug the refrigerator back in and observe whether the fan noise has decreased.
If this solution doesn’t work, it might be necessary to replace the fan altogether.
Remember, maintaining the refrigerator fan by timely lubricating not only helps in silencing a noisy refrigerator but also improves the efficiency and longevity of the appliance.
15. Use Specialized Noise Reduction Materials
As your refrigerator gets older, its parts may start to degrade, causing it to make more noise than when brand new.
One effective way to reduce this noise is through the use of specialized noise reduction materials.
There are various types of specialized materials that can help silence a noisy refrigerator.
Acoustic foam panels, anti-vibration pads, and soundproof blankets are among the top choices.
Acoustic foam panels can be attached to the back or sides of your fridge to absorb the sound.
They work by reducing the reflection of sound waves, thereby taming the noise.
Another noise reduction option is the use of anti-vibration pads.
These are placed under the refrigerator and work by absorbing and minimizing the vibrations that can cause noise.
Soundproof blankets are specially designed to absorb sound, offering another line of defense against refrigerator noise.
Not only are they effective, but they are also easy to use.
You simply have to hang or mount them as close as possible to your fridge without hindering its operation.
When choosing which noise reduction materials to use, there are several factors you should consider.
These include the intensity of the noise, your budget, and the placement and design of the fridge.
Of course, it’s potential that a combination of these materials may be needed if your fridge produces high levels of noise.
Keep in mind, these materials are easy to install, and you will be able to do it yourself with little to no experience.
For more visual learners, consider watching the embedded video for an illustrative guide on how to effectively minimize refrigerator noise.
You will gain valuable insights on how to effectively utilize these materials for maximum noise reduction.
Always remember, a noisy refrigerator is not only a nuisance but may also indicate underlying problems.
While using noise reduction materials can significantly decrease the noise, it is still vital to ensure the refrigerator’s optimal operation.
All in all, using specialized noise reduction materials can be a highly effective tactic to silence a noisy refrigerator.
The Bottom Line
Ultimately, employing these strategies can drastically reduce the noise output of your refrigerator, enhancing the tranquility of your home environment.
Careful maintenance, from leveling your fridge properly to occasionally defrosting it, will ensure your appliance runs optimally and silently.
Crafty changes such as placing padding under the fridge, insulating with acoustic foam and using specialized noise reduction materials not only offer an immediate quieting effect, but also provide long-term benefits.
Regular checks and replacements of components like the evaporator fan motor, the condenser fan, and worn-out compressor mounts can prevent potential noise issues before they even become a problem.
Incorporating these tactics ensures a serene, and harmonious living space with a notably silent refrigerator.