Creating a disturbance-free environment is crucial when it comes to DIY projects.
Noise pollution can not only be disruptive, but it can also hinder your focus and overall productivity.
This is particularly relevant for individuals who conduct activities such as woodworking, metalworking, or crafting in a workshop located within a residential setup.
Unwanted noise can lead to tension with neighbors or within the family.
Addressing this issue effectively requires implementing a range of soundproofing strategies.
In this article, we will explore some practical and cost-effective methods to efficiently reduce noise emanating from your workshop.
Contents
- Ways To Soundproof A Diy Workshop
- 1. Install acoustic foam panels on walls
- 2. Use Soundproof Paint for Wall Coverage
- 3. Place carpet or rugs on the floor
- 4. Hang Heavy-Duty Soundproof Curtains
- 5. Install sound-absorbing insulation in walls.
- 6. Use High-Density Drywall for Sound Protection
- 7. Install Soundproof Doors and Windows
- 8. Use noise-cancelling earmuffs for personal soundproofing.
- 9. Place Rubber Seals Around Windows and Doors
- 10. Get acoustic tiles for workshop ceiling.
- 11. Install Vinyl Sound Barriers.
- 12. Create a Room within a Room
- 13. Use soundproof blankets on walls.
- 14. Add soundproofing materials under flooring
- 15. Incorporate Bass Traps to Absorb Low-Frequency Sound
- The Bottom Line
Ways To Soundproof A Diy Workshop
1. Install acoustic foam panels on walls
One effective tactic to soundproof your DIY workshop is to install acoustic foam panels on walls.
These panels are specially designed to absorb sound and reduce echo within a room, making them a common choice in music studios and other environments where sound control is necessary.
By preventing sound waves from bouncing off the walls, acoustic foam panels can help to significantly reduce noise levels within the workshop.
Ideal for high-frequency sounds, these panels work by effectively trapping and dissipating sound waves.
They are also lightweight and easy to install, which makes them a popular choice among DIY enthusiasts.
Typically, these panels are mounted on the walls of the workshop.
In fact, placing them on the upper half of the wall can be particularly effective as this is where sound is likely to be reflected.
The effectiveness of the foam can be increased by staggering the panels in a checkerboard pattern. This helps to maximize sound absorption by creating additional paths for the sound waves to follow.
For an optimal result, it’s also recommended to cover as much of the wall surface as possible with the foam.
One of the great benefits of acoustic foam panels is that they are relatively affordable and available in a wide variety of sizes, shapes, and thicknesses, allowing you to tailor your selection to your specific needs.
You may also opt to combine the use of foam panels with other soundproofing techniques for an even more effective result.

By watching the embedded video, you’ll see a detailed, practical demonstration on how to install these panels without causing any damage to the walls. It’s a handy DIY guide filled with tips that could make the installation process easier and more effective for you.
But remember, every workshop is different. Therefore, what works for one might not work for another. Nonetheless, the installation of acoustic foam panels is a proven method that can greatly contribute to soundproofing your workshop.
So why not give it a try? With a little time and effort, you’ll be able to create a quieter, more efficient work environment.
2. Use Soundproof Paint for Wall Coverage
One of the most efficient and cost-effective ways to soundproof a DIY workshop is through the use of soundproof paint.
As opposed to regular paint, soundproof paint is specifically designed with sound-absorbing ingredients.
Its special formulation enables it to reduce noise transmission into and out of a room, making it a must-have for any DIY workshop aiming for soundproofing.
This, undoubtedly, enhances your ability to work without disturbing people in other rooms or being bothered by noise from outside. The advanced technology used in the manufacture of soundproof paint ensures it can absorb and reflect sound effectively.
In addition to its soundproofing capabilities, this paint also offers a smooth finish and comes in various colors according to your preference.
Applying soundproof paint is very much similar to how you’d apply regular paint. It doesn’t require special skills or tools. Highlighting its ease of use for a DIY enthusiast.
After properly cleaning and prepping your workshop walls, you can apply the soundproof paint using a brush or roller.
It typically requires two to three coats for maximum effectiveness.
This layering technique is crucial as it increases the paint’s ability to absorb and dampen sound. More layers will provide a better sound barrier.
Remember, it is important to let each coat dry thoroughly before applying the next. This will ensure the soundproofing properties are maximized.
The drying time often depends on the brand of soundproof paint you’re using. It is always best to follow the manufacturer’s instructions to achieve the best results.
The versatility of soundproof paints is a well-noted feature. It can be applied not only on walls but also on ceilings and even doors or furniture.
This makes it particularly useful if you have several surfaces in your workshop that need to be soundproofed.
A combination of soundproof paint with other methods such as acoustic foams or seals can further optimize your workshop’s soundproofing capabilities.
By integrating these strategies, your DIY workshop can provide an effective and pleasant work environment, both in terms of visual aesthetics and reduced noise levels.
However, it is important to note though that while using soundproof paint is a significant step towards reducing sound transmission, it may not entirely eradicate noise. Particularly when dealing with high-frequency sound.
This means, for complete soundproofing of your workshop, it would be beneficial to employ multiple soundproofing strategies.
Nevertheless, soundproof paint is a proven, affordable, and easy-to-use soundproofing solution that deserves consideration for your DIY workshop.
3. Place carpet or rugs on the floor
One influential method to consider is placing carpets or rugs on the floor of your DIY workshop, as they can contribute significantly towards soundproofing.
This tactic acts as a barrier, preventing the sound from carrying and consequently reducing the overall noise level.
>Moreover, the thickness of a carpet or rug can catch and absorb noise, effectively reducing echo and improving the acoustics of the workshop.
This is particularly beneficial if your workshop has hardwood or tile floors which reflect sound rather than absorbing it.
Sound waves bounce off hard surfaces, but carpets and rugs have a soft surface that can absorb these waves.
This absorption effect works to ensure that less noise escapes into adjacent rooms as well.

By watching this embedded video, you can get a practical understanding of how a rug contributes to sound insulation in real time.
It also provides useful tips on selecting the right kind of rugs for soundproofing.
While carpets cover larger areas, rugs can be effectively used in specific areas where noise is generated, such as underneath power tools.
Another noteworthy aspect is that they add an extra layer of insulation between the sound source and the floor.
This additional layer serves to mute any vibrations caused by heavy machinery or equipment, thus curbing noise transmission substantially.
One other advantage is that carpets and rugs are relatively easy to install and require no major adjustments to your workshop setup.
,So, from a practicality perspective, this is a method that yields significant results with minimum effort or investment.
It’s also worth noting that carpets and rugs not only help in soundproofing but also contribute to the overall aesthetic appeal of your workshop.
Thus, soundproofing your DIY workshop with carpets or rugs serves a dual purpose: reducing noise levels and enhancing the visual appeal of your workspace.
Therefore, if you want a method that is effective, easy, and visually pleasing, carpets or rugs could potentially be your best bet for soundproofing your DIY workshop.
4. Hang Heavy-Duty Soundproof Curtains
If you are looking for a versatile and functional way to soundproof your workshop, consider hanging heavy-duty soundproof curtains.
These curtains, often made from dense materials like mass-loaded vinyl, are specifically designed to prevent sound transmission.
They work by absorbing and dissipating sound waves, thus preventing sound from passing through the materials.
Unlike ordinary curtains, heavy-duty soundproof curtains are often thicker and heavier, providing a higher degree of sound resistance.The thickness and density of the material help to minimize sound transmission. Because the curtains are made from dense materials, sound waves have a harder time passing through, resulting in a quieter workspace.
This makes soundproof curtains an exceptional solution for containing noisy operations within the confines of your workshop.
Another benefit of soundproof curtains is that they are easy to install. This simplicity in installation will make your DIY soundproofing project a breeze.
Moreover, these curtains are not only functional but also aesthetically pleasing. You can choose from a variety of colors, patterns, and styles to match your workshop’s decor.
Heavy-duty soundproof curtains can also help to improve acoustics within the workshop.The materials used in these curtains are effective at absorbing hard sound reflections, leading to improvements in acoustic quality. This can be an important factor if you are creating audio or video content within your DIY workshop.
To install the curtains, simply measure the height and width of your window or door to find the appropriate size.
Then, attach a curtain rod above the window or door frame and hang the curtains according to the manufacturer’s instructions.
It’s important to ensure that the curtains cover the entire window or door for the best soundproofing results.
Again, heavy-duty soundproof curtains are an easy and effective way to soundproof your DIY workshop. They are versatile, easy to install, and can even improve the acoustics of your workspace.
Remember, the goal is to minimize exterior noise and contain the noise produced within your workspace. So, do not hesitate to combine the use of soundproof curtains with other methods mentioned in this guide for more efficient soundproofing.
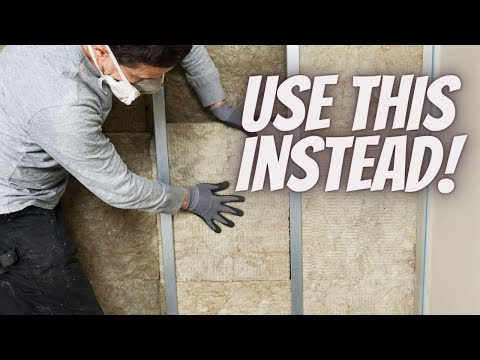
5. Install sound-absorbing insulation in walls.
Soundproofing a DIY workshop can be a significantly rewarding task, especially when you install sound-absorbing insulation in the walls.
That’s because walls can transmit a good amount of sound, and the right insulation can dramatically lessen this transmission.
Insulation is typically tucked in between the studs of a wall during the construction process. For those with existing walls, blown-in insulation might be the preferable route.
Blown-in insulation uses specific machinery to inject insulation materials directly into the existing walls, reducing the need for extensive renovations.
Sound-absorbing insulation usually comprises materials like mineral wool and fibreglass.
These materials are both lightweight and sound-absorbent, making them ideal for wall insulation when looking to soundproof a space.
In addition to reducing sound transmission, these materials also contribute to temperature control in your DIY workshop.
By managing the heat levels in the room, the insulation also keeps your workspace comfortable, whether you’re working in scorching summers or freezing winters. Furthermore, this contributes to increased energy efficiency in your workshop.
Indeed, balancing sound reduction and temperature control optimizes your workshop’s environment, facilitating more effective crafting and DIY projects.
You’ll find an in-depth explanation of sound-absorbing insulation in this video. You will learn valuable tips about selecting the best material for your specific needs and how to go about the installation process correctly.
There are, however, some considerations to take into account before installing sound-absorbing insulation.
First, it’s essential to ensure that the walls are dry, as wet or damp walls can lead to mould growth in the insulation.
Second, you should also give thought to the thickness of the insulation. The thicker the insulation material, the greater the sound absorbing ability.
Lastly, while you can install sound-absorbing insulation yourself, if you are unsure about the process, it may be beneficial to seek professional help.
This ensures that the installation is done correctly, giving you maximum soundproofing and insulation benefits.
6. Use High-Density Drywall for Sound Protection
Investing in high-density drywall for your DIY workshop is a crucial step towards making the space soundproof.
This kind of wallboard, also known as soundproof drywall, provides a highly effective means of reducing noise transmission through walls due to its dense composition.
Notably, high-density drywall is made by adding certain materials such as glass particles and ceramics to the gypsum core, making it significantly denser than conventional drywall.
This density difference does not only enhance the board’s impact resistance and durability but it also increases its ability to block the transmission of sound waves.
When sound waves hit the surface of the high-density drywall, the energy gets dissipated by the denseness of the material, resulting in diminished noise levels on the other side.
Importantly, high-density drywall is more effective at soundproofing when compared with similar thickness of other types of drywall.
It may thus be worth the added investment, notably if you work with power tools or engage in tasks that produce high levels of noise.
For installation, just like any standard drywall, high-density drywall sheets are fitted onto the frame of the wall.
Drywall screws are used to secure it, then the process is followed up with taping, mudding and painting, achieving a seamless and smooth finish.
For better soundproofing performance, some experts recommend using resilient channels between the studs and the drywall.
This creates a decoupling effect that helps break the path of sound vibrations and further reduce noise transmission.
Certainly, applying a layer of soundproofing compound or a soundproofing membrane between two layers of high-density drywall can significantly enhance the wall’s sound-blocking capacity.
This compound or membrane, when sandwiched between layers, works by converting sound energy into heat energy, thus further damping down the noise level.
While there is a slightly higher cost associated with using high-density drywall, the difference in sound transmission is measurable and significant.
Plus, the added benefit of durability and impact resistance of this dense material makes it a popular choice among workshop owners.
Ultimately, relying on high-density drywall is one of the most efficient ways to keep your DIY workshop quiet and enjoyable.
To conclude, regardless of the type of activities you carry out in your DIY workshop, applying high-density drywall can have impressive effects on the overall sound protection within your space.
7. Install Soundproof Doors and Windows
Many workshops tend to overlook the crucial role that doors and windows play in soundproofing the space. Soundproof doors and windows are designed to not only minimize noise interruptions but also assist in maintaining a peaceful workshop environment.
This is especially important in a DIY workshop where precision and focus are paramount. From the sound of whirring saws to the sporadic hammering, without proper soundproofing, these noises can be downright distracting and intrusive.
How exactly does a soundproof door or window work? These specialized structures use heavy, dense materials that effectively block the transmission of sound waves through air gaps. What’s great about these doors and windows is that they still allow light to penetrate into your workshop.
Furthermore, they also incorporate high-end seals that ensure even the tiny air gaps are catered for. Door sweeps, particularly, are a great addition to these doors as they add an additional soundproofing layer.
Installing soundproof doors and windows might appear like a substantial investment, but the quietness that accompanies their usage is worth every penny.
This significant step might necessitate a bigger budget than other soundproofing methods, however, it acts as an insurmountable barrier to sound escape hence optimally soundproofing your workshop.
Most importantly, the installation process of these soundproof doors and windows is not as complicated as it might seem. With a bit of DIY spirit, you can successfully install them within your workshop.
But remember, the success of this installation process greatly lies in the prior measurement accuracy. Carefully measure the door and window spaces to ensure a perfect fit as any gaps can tremendously compromise the soundproofing aspect.
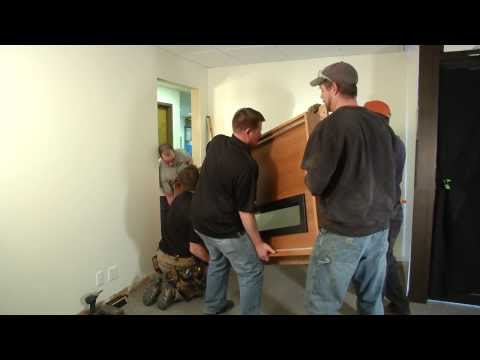
In the embedded video, you can learn some practical soundproofing installation steps. The tutorial provides an in-depth guide on how to properly install a soundproof door, a guide that can similarly be leveraged while installing soundproof windows.
Whether you are a professional or a DIY enthusiast, these soundproof doors and windows provide an all-rounded solution to maintaining a serene workshop environment. Cutting down on noise ensures that you get a space that is not only conducive for working but also for thinking and innovating.
Additionally, their high-quality materials and sturdy construction are surprisingly energy-efficient. So while they effectively improve your workshop’s acoustics, they also become a plus for your energy costs by providing excellent heat insulation.
All in all, an investment in these soundproof doors and windows is worthwhile. Sure, it might be a bit costly upfront, but the resulting peaceful and conducive environment is well worth it.
8. Use noise-cancelling earmuffs for personal soundproofing.
While working on your DIY projects in your workshop, sometimes it’s important to take personal measures to keep the noise level down.
One effective and immediate solution is to use noise-cancelling earmuffs.
These accessories work to nullify the environmental noise by using active noise control technology.
This is essentially a system where secondary sounds are produced to counterbalance unwanted primary sounds.
For those working in a DIY workshop, noise-cancelling earmuffs can prove extremely beneficial.
This not only helps in reducing the overall noise you are exposed to but also ensures your focus and concentration are not affected.
By using noise-cancelling earmuffs, you are investing in your sense of calm and focus, making your workshop experience more productive and enjoyable.
This sentence elaborates on how noise-cancelling earmuffs work not just as a tool for personal soundproofing but also as an aid to achieving better productivity.
For those working in a DIY workshop, sometimes distractions can hinder the creative process.
The chaotic mixture of machine noises, tool clanking, and background noises can easily break your concentration, reducing your efficiency.
Noise-cancelling earmuffs can effectively mitigate this concern.
There are a plethora of options available in the market today, equipped with various features like wireless technology, built-in microphones, and volume controls, providing a comfortable and customizable working experience.
However, it is essential to note that all earmuffs don’t cancel noise completely, they reduce the loudness of sounds while allowing the wearer to still be aware of their surroundings.
This can be extremely beneficial in a workshop setting where one needs to be alert and aware for safety purposes.
On the other hand, some advanced noise-cancelling earmuffs come with a feature that allows you to regulate the amount of ambient noise reduction.
So, while installing other soundproofing materials, earmuffs can easily complement your other efforts and help create a balanced, noise-controlled environment.
9. Place Rubber Seals Around Windows and Doors
When working on a DIY workshop soundproofing project, a strategy you should not ignore is the placement of rubber seals around windows and doors.
Rubber seals are widely recognized for their supreme effectiveness in blocking air and noise transmission.
These seals are manufactured from high-density rubber materials which possess excellent soundproofing characteristics.
The process of installing rubber seals is quite straightforward and does not require any professional tools or expertise.
Apart from inhibiting noise penetration, rubber seals also act as insulation, thus promoting energy efficiency in your workshop.
The positioning of the seals is extremely crucial in realizing desired results.
They should be correctly positioned at the gaps between your windows and doors and their frames.
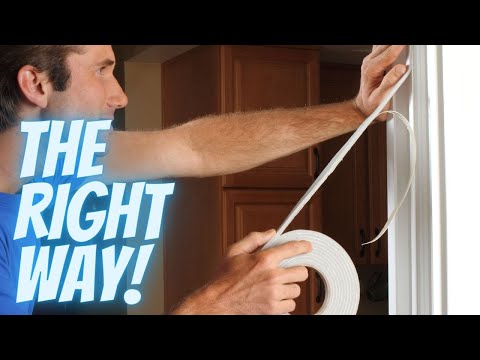
Watching the embedded video could be really helpful in visualizing how to effectively place the rubber seals.
It demonstrates a detailed and well-explained procedure that will guide you through every step of the installation.
The positioning of the seals is extremely crucial in realizing desired results. They should be correctly positioned at the gaps between your windows and doors and their frames.
It’s important to note that the effectiveness of rubber seals in soundproofing heavily depends on the quality of the seals and how well they are installed.
It is hence advised to choose high-quality rubber seals and follow the appropriate procedure during installation to ensure the best outcome.
Also, the seals will often endure lots of friction, so they should have excellent resistance to wear and tear.
In case the seals wear out, they should be easily replaceable to maintain the soundproofing efficiency of your workshop.
Do not forget to regularly check and maintain your rubber seals to ensure their prolonged service life and sustained soundproofing ability.
Failing to do so might lead to diminished soundproofing efficiency, which might cause noise disturbances in your workshop.
10. Get acoustic tiles for workshop ceiling.
One integral aspect of soundproofing your DIY workshop is to install acoustic tiles on the ceiling.
These tiles are designed specifically to minimize noise levels by absorbing sound waves rather than letting them bounce around the room.
Acoustic tiles often come in a variety of sizes, styles, and materials to suit the specific needs and aesthetics of the space being soundproofed.
The installation process is usually quite straightforward and can be performed as a DIY project.
Most tiles are lightweight and can be secured to your ceiling with adhesive, while others might require a drop ceiling framework for installation.
Research is key when selecting the right acoustic tiles for your workshop.
It’s important to consider factors such as the type of noise you’re trying to reduce, the size of your workshop, and your budget.
Also, note the NRC rating (Noise Reduction Coefficient) of the tiles, which indicates the measure of the sound-absorption capacity of the material.
Typically, an NRC rating of 0.5 or higher is considered best for workshops and heavily populated areas.
Tiles with a higher NRC rating will absorb a greater percentage of sound, thereby providing superior soundproofing.
This essentially means that tiles with a higher NRC rating reduce the amount of noise pollution more effectively.
All in all, the soundproofing capabilities of these tiles are phenomenal, and they can make a marked difference in the quality of sound within your workshop.
This fact alone makes acoustic tiles a worthy investment for any workshop owner who values a quiet, focused working environment.
Like most soundproofing materials, acoustic tiles require maintenance to continue performing optimally.
Factors such as age and environmental conditions can cause the tiles to become less effective over time, which necessitates their regular inspection and occasional replacement.
However, the payoff is worth it, as maintaining a sound-controlled environment can boost productivity and make your workshop more enjoyable to work in.
11. Install Vinyl Sound Barriers.
If you’re a DIY enthusiast, finding ways to improve your workstation can be a satisfying venture. When it comes to soundproofing, one of the best solutions is to install vinyl sound barriers.
Vinyl is deemed as a superior soundproofing material due to its high density, flexibility, and ease of installation. Its effectiveness in absorbing sound and reducing noise transmission is notable, thus, making it an ideal material for soundproofing purposes.
Vinyl sound barriers, in particular, offer high Sound Transmission Class (STC) ratings, indicating their excellent ability to block sound.
Vinyl barriers work to soundproof by adding mass to your walls, a strategy recognized as one of the most effective ways to reduce noise transmission.
By installing a vinyl barrier, you not only increase the density of the wall but also add an additional layer that effectively blocks sound.
Indeed, the added layer or mass from the vinyl hinders sound waves, preventing them from easily vibrating through the walls. Additionally, the flexible nature of vinyl allows it to dampen vibrations, further enhancing its soundproofing qualities.
Apart from walls, vinyl barriers can also be used to soundproof ceilings and floors. This versatile use is due to the material’s flexibility and high density, making it extremely effective in reducing airborne and impact noise.
Contrary to popular belief, sound-blocking vinyl barriers can come in different styles and designs, meaning they don’t have to interfere with your workspace aesthetic. Even so, their primary function remains the same: to absorb and block sound effectively.
A soundproof DIY workshop is peaceable and productivity-inducing, making the task of installing vinyl sound barriers certainly worth the effort.
Also, the installation process is relatively straightforward and can be managed as a DIY project if you’re handy enough. However, if you’re uncertain of the task, there’s no harm in seeking assistance from a professional.
While the initial cost of purchasing and installing vinyl sound barriers can be somewhat pricey, it is worth considering the long-term benefits. Essentially, soundproofing your DIY workshop is a one-time investment that will significantly enhance your workspace environment.
httpv://www.youtube.com/watch?v=7Si—sw36UBy watching this video, you’ll get to see a practical demonstration on how to install vinyl sound barriers correctly. This will provide you with a clearer understanding of the entire installation process, equipping you with the knowledge you need to soundproof your DIY workshop effectively.
12. Create a Room within a Room
One interesting and highly effective method for soundproofing a DIY workshop is to create a room within a room.
This is often considered the ultimate solution for sound isolation, particularly in scenarios where you want to eliminate noise completely, or substantially soften it.
The concept of creating a room within a room is exactly what it sounds like – you’re essentially building a second, smaller room within the larger room.
This practice, also known as the double wall technique, is a common feature in professional recording studios as well as highly sensitive areas such as research labs.
In the scope of a DIY workshop, the implementation will be slightly different.
If you’re serious about your DIY projects and frequently use tools that generate a high level of noise, creating a room within a room will offer the soundproofing you need.
This isn’t to suggest that the method is easy; it requires careful planning, precise measurements, and may necessitate a significant time investment.
The first step is to measure out your space and determine where exactly the new room will sit within the existing room.
Once that’s determined, you’ll need to construct walls independent of the existing walls.
Sound isolation clips and channels can help create this separation which is crucial for sound isolation.
Insulating the new walls is critical as well, to block out airborne noise.
Soundproof wall panels or dense insulation like mineral wool or fiberglass will be excellent choices for this.
Ceiling and floor of the new room should also be soundproofed to prevent sound leakage from these potential weak spots.
Your new room will now need a soundproof door and possibly even a second layer of drywall for additional sound deflection.
Remember, every layer you add and every detail you take into account will decrease the sound leakage.
Finally, the room should be filled with sound-absorbing materials like foam or carpet to eliminate echoes and reverberations.
While this method could involve substantial work and cost, it guarantees serious sound reduction, making your workshop a more relaxed, comfortable place to work.
Once the job’s done, you’ll have a dedicated, soundproofed space where you can focus on your craft without worrying about disturbing others.
13. Use soundproof blankets on walls.
When exploring the various ways to soundproof a DIY workshop, the use of soundproof blankets is a strategy worthy of consideration.
These are special blankets designed with layers of sound-absorbing material, which conveniently reduces the amount of sound that transmits through the walls.
Soundproof blankets are very practical because they can be removed and replaced as needed, providing flexibility in a workspace that may need to adapt or evolve over time.

By viewing the video provided, you can discover the practical measures of soundproofing a room more effectively.
Notably, you will gain insights on how to install soundproof materials, and the specific techniques that can enhance their effectiveness.
Purchasing and installing these blankets is quite straightforward.
They are available in a variety of sizes and thicknesses, allowing you to choose the best ones that suit your unique soundproofing needs.
Moreover, they offer different colors and styles, providing opportunity to not just soundproof, but also aestheticize your workshop.
Using these soundproof blankets will help in significantly reducing the amount of ambient noise and echo within your workshop.
This is crucial especially if you are using heavy-duty equipment that can cause loud noises.
Thus, soundproofing your workshop with blankets will ensure you have a serene working environment devoid of unnecessary noise distractions.
Additionally, if your workshop is located near bedrooms or living spaces, using these blankets can prevent disruption to other occupants in the building.
When installing these blankets, remember to cover all the walls in your workshop thoroughly.
Failing to do so may create areas where sound can still escape, thus defeating the purpose of the soundproofing effort.
Ensure that you also cover other areas that may allow sound to leak out, such as windows and doors.
Lastly, it is important to note that while soundproof blankets can significantly reduce noise levels, they may not eliminate sound completely.
This is because sound can still travel through vibrations in the building structure or ventilation systems.
Therefore, for best results in soundproofing your workshop, it is advisable to combine the use of blankets with other soundproofing measures like foam panels, rubber seals, and high-density drywall.
Again, soundproof blankets are an effective, flexible, and convenient solution for mitigating noise problems in your DIY workshop.
They offer a simple and practical way to manage noise levels, thus enhancing your comfort and productivity in the workspace.
14. Add soundproofing materials under flooring
When soundproofing a DIY workshop, one area that is often overlooked is the floor. Just like walls and ceilings, the floor can serve as a conduit for noise.
By adding soundproofing materials under the flooring, you can significantly reduce the amount of noise that escapes from your workshop.
The best time to install soundproofing materials is during the initial flooring installation. However, for an existing floor, some solutions can still be implemented.
It’s important to note that the effectiveness of this type of soundproofing will largely depend on the type of material you use.
Certain materials, like mass loaded vinyl (MLV), are especially known for their high density and exceptional soundproofing capabilities.
This is because MLV is designed to dampen sound energy, preventing most of it from passing through. It works by adding mass to your floor, which makes it much more difficult for sound waves to vibrate.
Rebond carpet pads are another alternative for flooring soundproofing. These are made from recycled foam scraps and have a multi-colored appearance due to the various foam materials used in the composition.
While MLV is thinner and easier to work with, rebond carpet pads have a greater thickness, which can provide better soundproofing in some cases.
For best results, consider combining these two materials. Start by laying down the MLV, then add the rebond carpet pad and finally, install your flooring.
Remember, while this is an effective method of soundproofing, it doesn’t negate the need for soundproofing other areas of your workspace.
For instance, if your workshop has an exterior wall that shares with a living area, you will need to consider impact noise beneath the workshop.
Impact noise, also known as structure-borne noise, is caused by vibrations through the structure of the building. This can travel from the workshop to the rest of the house if not properly contained.
Therefore, the right soundproofing materials under your workshop’s flooring can both prevent this kind of noise transfer and simultaneously enhance the noise barrier properties of the workspace.
Soundproofing the flooring is all about creating multiple layers of defense against the propagation of sound.
While it may involve a degree of work and investment, the peace and tranquility it brings to the rest of the home makes it worth every effort.
15. Incorporate Bass Traps to Absorb Low-Frequency Sound
Bass traps are a niche but essential element in our slew of soundproofing strategies for your DIY workshop.
As their name would imply, they are designed to absorb and disrupt the low-frequency sound waves that other soundproofing measures might not effectively address.
“The power of these bass traps lies in their ability to focus on those lower-frequency sound waves, which are notoriously hard to manage.”
This is due, in large part, to the size and power of these waves.
While higher-frequency waves are more easily absorbed by traditional methods like acoustic foam and soundproof paint, the more robust low-frequency waves require specialized solutions.
Bass traps are, thus, a logical choice.
While not every DIY workshop will require the use of bass traps, they can be a critical addition in spaces where heavy machinery or power tools are in use.
These devices often generate powerful low-frequency sounds, making bass traps a worthwhile investment for those looking to create a fully soundproofed environment.

Shown in the video above, viewers get a more in-depth look into the world of bass traps and their proper placement.
After watching, the viewer may gain a better idea of not only what these devices are capable of, but also how to most effectively implement them in their own workshop setup.
Bass traps come in several forms, but they all function on the same principle: absorbing low-frequency sound waves and reducing echo and vibration.
Not only does this make your workshop a quieter, more productive place, but it also can improve the overall vibe of the room.
The right placement of bass traps can critically impact their efficacy.
A thorough understanding of the dynamics of your space will ensure that your bass traps are placed ideally to optimize the sound absorption of low-frequency vibrations.
By strategically placing your bass traps based on the unique acoustic properties of your workshop, you can best utilize their power to absorb low-frequency sounds effectively.
This dedication to detail will cultivate a more silent and productive workshop environment.
The Bottom Line
Ultimately, soundproofing your space can be achieved through a variety of practical solutions, from installing foam panels, using soundproof paint, carpets, and heavy-duty curtains, to setting up high-density drywall, soundproof doors and windows, and acoustic ceiling tiles.
Sound-absorbing insulation and vinyl sound barriers provide additional defense against excess noise.
Personal soundproofing can be improved with noise-cancelling earmuffs, while rubber seals for windows and doors further aid in limiting noise intrusion.
Building a room within a room, lining walls with soundproof blankets, placing soundproofing materials under flooring, and incorporating bass traps can also significantly dampen unwanted noise.
By applying these strategies, you can create an oasis of calm and quiet, regardless of the noise in your surrounding environment.